
Connect your own Twilio account
For OwnersChecked against the app on October 1, 2026
You don't need a Twilio account to use HiloVoice: it gets your numbers for you. Twilio is on the Integrations page for a business that already has a Twilio account, with numbers in it, and wants to keep them there. Once it's connected, HiloVoice works with that account: it lists the numbers in it, buys new ones into it, and answers and texts on them.
Before you start
- You're an Owner, Admin or Builder. Buying numbers afterwards takes an Owner or Admin.
- You can sign in to the Twilio Console as the account that owns the numbers, or will own them.
- You need the account's live Auth Token. Test credentials can't buy numbers or carry calls.
Steps
Open Settings → Integrations and click Twilio. On the How to tab, click Open the Twilio Console.
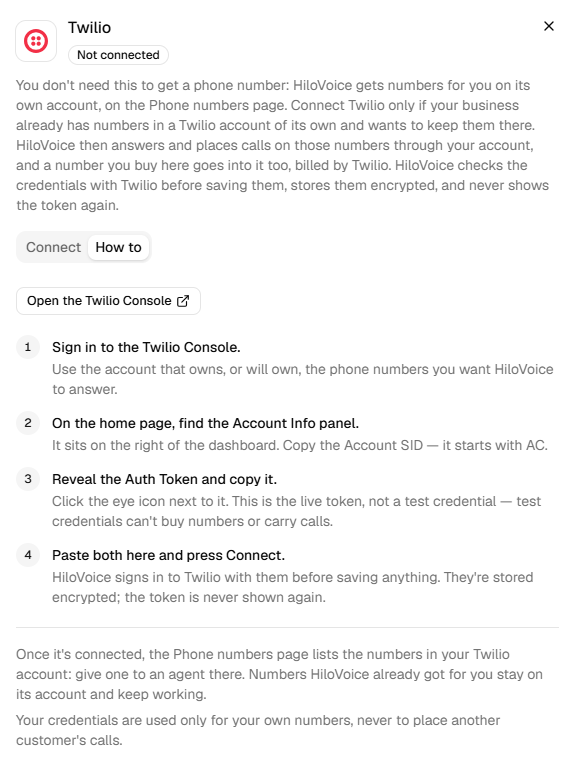
In the Twilio Console, on the home page's Account Info panel, copy the Account SID. It starts with
AC.Click the eye icon beside the Auth Token, and copy the token.
Back in HiloVoice, on the Connect tab, paste them under Account SID and Auth Token.
Click Connect Twilio. HiloVoice signs in to Twilio with them before saving anything (Checking with Twilio…).
The row reads Connected, with Account ending and the last four characters of the Account SID.
What happens next
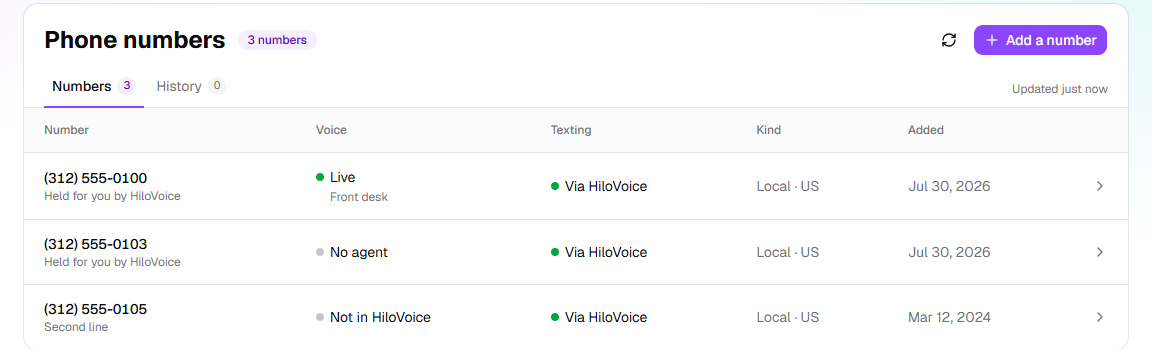
- Phone numbers lists every number in your Twilio account, read from Twilio each time you open it. Numbers bought in the Twilio Console show up there too, and a number bought through HiloVoice shows what it costs a month.
- A number HiloVoice doesn't use yet says Not in HiloVoice. Click it, then Add to HiloVoice. That costs nothing and changes nothing in Twilio. Then give it to a Receptionist on the agent's Phone Number step.
- Numbers you buy from now on go into your Twilio account, and Twilio bills them: the confirmation says Twilio bills your account <price> a month for it, starting now. They don't count towards the phone numbers your plan includes.
- An agent texts from your number once Twilio has cleared it to text: in the US, a registered A2P 10DLC campaign, or an approved toll-free verification. Until then, texts go from HiloVoice's own number and the Texting column says Via HiloVoice. Click the number to read why.
- Numbers HiloVoice got for you before stay with HiloVoice and keep working. Phone numbers lists them as Held for you by HiloVoice.
Important: When a Receptionist goes live on a number from your Twilio account, calls to that number come to HiloVoice instead of wherever Twilio sent them. So do its texts, if the agent takes answers by text.
Important: Disconnect stops every number that relies on the account until you connect it again, and you'll need to enter the Auth Token again.
If it does not work
| You see | Why | What to do |
|---|---|---|
| Twilio's own words, such as Authentication Error - invalid username, or Twilio rejected that Account SID and Auth Token. | The Account SID or Auth Token is wrong, or from a test account | Copy both again from Account Info, using the live Auth Token. |
| Twilio could not be reached: … or Twilio did not respond in time. | Twilio didn't answer. Your credentials may be fine. | Try again in a moment. |
| The row says Needs attention, and a banner says Twilio has stopped working | The Auth Token was changed in Twilio, or the account was suspended | Open Replace credentials, paste the new token with the Account SID, and click Save new credentials. |
| Add a number is greyed out, with Only an owner or admin can add numbers | Your role is Builder or Analyst | Ask an owner or admin to buy it. |
Read next
- Manage your phone numbers — the Phone numbers page
- Give a Receptionist its number — putting an agent on a number
- What you can connect — how every integration is checked and stored