
Confirm tomorrow's appointments
For BuildersChecked against the app on October 1, 2026
A Confirmations agent calls each person on a list, reads their appointment back, and records whether they're coming. When someone can't make it, it can move the appointment on the call, or note it for your team. This playbook builds one for Maple Street Dental, from an organization with no agents, and runs its first campaign: tomorrow's appointments. The choices that matter here are what it reads back, who may answer for the patient, whether it can move a booking, and the number patients see.
Before you start
- You're an Owner, Admin or Builder.
- The agent needs a number to call from. If your organization has none, an Owner or Admin gets one on the agent's Caller ID step. The number your Receptionist answers is best; see Set up a receptionist for a clinic.
- Campaigns are on your plan. If they aren't, New campaign is greyed out and names the plan that has them.
- Tomorrow's appointments as a spreadsheet (CSV, XLSX or XLS): one row per patient, with their phone number, first name, and the appointment's day and time. Most practice software can export one.
- For the agent to move an appointment on the call, the appointment has to be in a calendar connected under Settings → Integrations.
Steps
Create the agent
- In the menu, open Agents and click Create my first agent (New agent, once you have one).
- Under What kind of business is this?, choose Dental practice.
- Under What should it handle?, choose Confirmations. It's offered the name
Appointment confirmations; typeReminder callsif you prefer. - Click Create my agent. The builder opens with a card that says <name> is ready to call for Maple Street Dental.
- On the card, click See the questions. The Details step opens.
Say what it confirms
Each detail is something the agent reads back from your list, or asks. Choose what the agent asks has every setting.
Keep a detail for each thing on your list the patient should hear: the day and time, and the dentist if you like. Click X on the rest.
Open the appointment's detail. Leave Where it comes from on We already know it, and under What to do with it, choose Read it back to them.
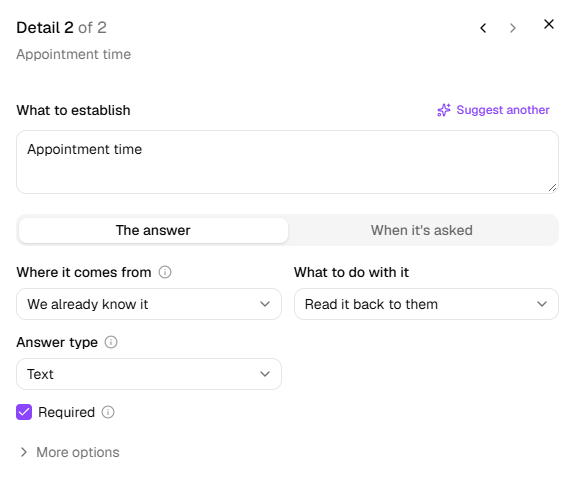
If there's no first name, click Add a detail and type
First name. The opening line uses it.Click Opening. Under Opening line, write
Hi, may I speak with {{first_name}}? This is Sarah from Maple Street Dental, calling about your appointment tomorrow.Type{{to pick the first name from the list.Under Who can take the call, switch on Someone else may answer for them: a parent can confirm, move or cancel a child's appointment, and the notes say who did.
Leave Voicemail on Leave a short message.
Write an outbound agent's opening covers the rest of the step.
Set when it calls, and from which number
Click Calling Hours. Check the Timezone, and set when patients may be called: weekdays 9 to 7, say.
Click Caller ID, then Call from this beside the number patients know. A number your Receptionist answers is marked Suggested: a patient who rings back reaches it, and it can confirm or move the appointment then.
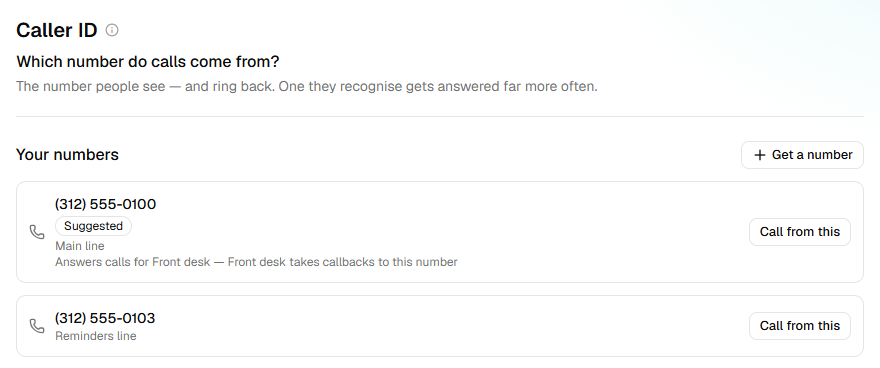
If there's no number to choose, an Owner or Admin clicks Get a number and buys one. It becomes the caller ID at once.
To have the agent move appointments, open Optional, click Appointment Booking, and switch on Book appointments.
Under Booking link, paste the link to the appointment in your connected calendar, click Use this link, and leave Book on the call on. The agent finds the patient's booking in your calendar before it moves it.
Warning: Calling outside reasonable hours is restricted in many places, and some places require an automated call to say so at the start: choose Say so upfront under Saying it's automated, on Opening, where that applies. You're responsible for your own compliance; see Your responsibilities on calls.
Try it, then go live
- Click Try it. Make up a patient in the boxes under On a real call these come from your records. For this one, make them up.
- Click Have it call me, and answer in your browser as a patient who can't make it.
- Click Review & Go Live, fix anything under Is it ready?, and click Go live. The page says <name> is live as of … and gives the number it will call from.
Going live calls nobody. Calls go out only when a campaign that uses the agent starts.
Call tomorrow's patients
Make the campaign once the agent is live: a new campaign takes its calling hours and attempts from the live agent. Create a campaign and Import a campaign's recipients cover each part.
In the menu, open Campaigns and click New campaign.
Under Agent, choose the agent. Under Name, type
Reminders, Friday 2 October, and click Create. The campaign opens on Add people.Click Download this example for a file with the columns this agent expects, and make tomorrow's list match it.
Click Choose a file and pick the list. Check what each column is: Phone number, First name, and the appointment as Something the agent can use, under the detail's name.
Click Add <n> rows.
Open Launch and read Check the settings: the number it calls from, the calling window, and Attempts per person, which starts at 3 attempts, 2 hours apart. Change settings opens them.
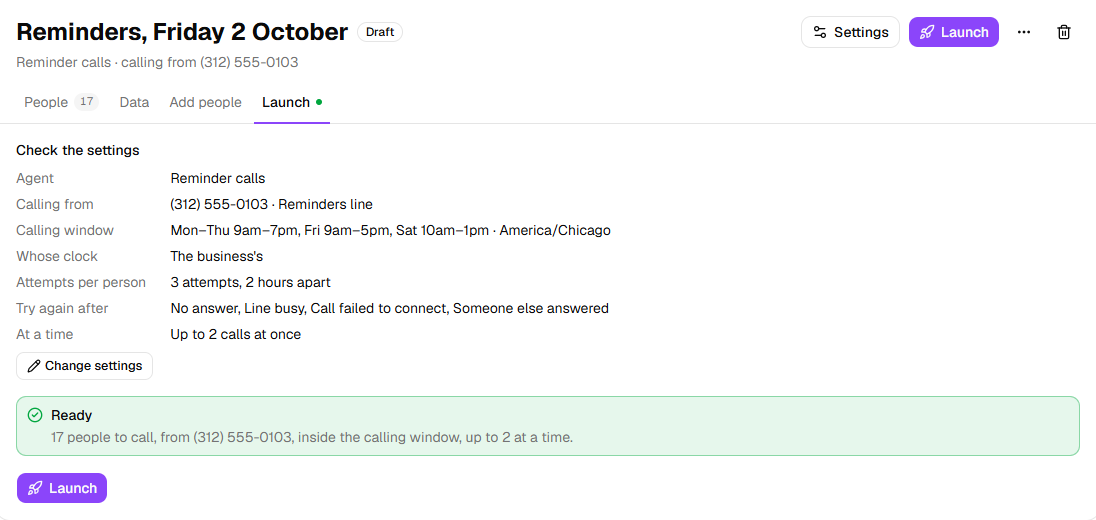
Click Launch, choose Start now, and click Launch.
Important: Launching calls real people, inside the calling window, a few at a time. You can pause the campaign at any point.
What happens next
People shows each patient's Status and What happened: confirmed, cancelled, needs reschedule and so on. A needs reschedule row is Done as far as the campaign goes: someone at the practice calls them to find a new time, unless the agent moved it on the call.
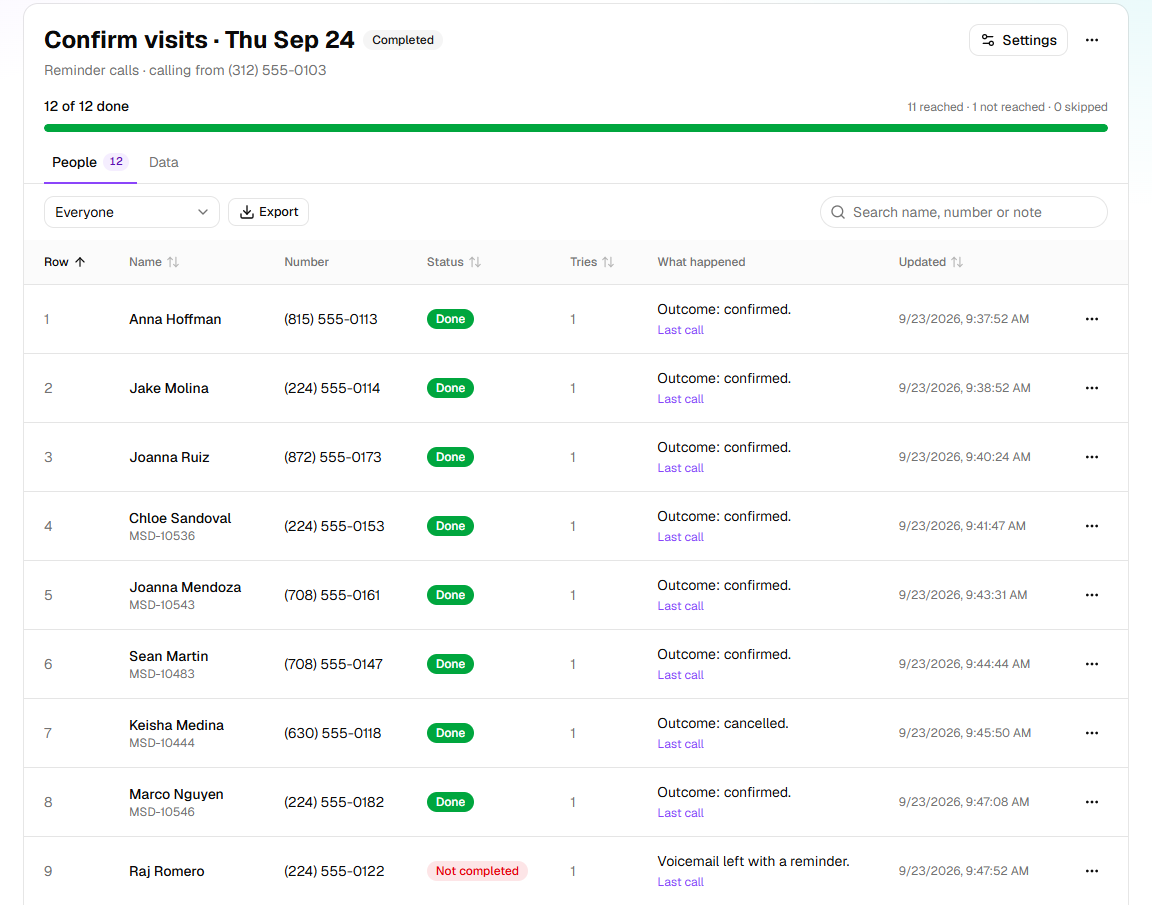
When someone else answers, the patient is called again two hours later. A voicemail, with the message left, isn't called again unless you tick Voicemail under Try again after in the campaign's Settings.
When the agent calls from your Receptionist's number, a patient who rings it back reaches the Receptionist, which confirms the appointment and settles their row.
Each day's list is a campaign of its own. A campaign takes new people only while it's a Draft, Scheduled or Paused.
Export downloads the list with what happened to each patient.
If it does not work
| You see | Why | What to do |
|---|---|---|
| No agent places calls yet, under Agent | The organization has no agent that places calls | Create the Confirmations agent first. |
| Pick the column with the phone number. | No column is set to Phone number | Choose Phone number for the column that holds it. |
| The agent also expects <detail> (<key>) — no column gives it, so it will be blank on the call. | A We already know it detail has no column | Set the column that holds it to Something the agent can use, under the detail's name. |
| Not ready yet, with The agent has not been published yet. | The agent isn't live | Click Go live on its Review & Go Live step. |
| Not ready yet, with The agent has no number to call from. … | The agent has no caller ID | Choose one on its Caller ID step, or under Call from in the campaign's Settings. |
| Paused: The agent has no caller ID to call from. | The caller ID was taken off while the campaign ran | Choose a number on Caller ID, then click Resume. |
Read next
- Set a campaign's calling hours and retries — the calling window, and when a patient is called again
- Monitor a running campaign — statuses, and why a campaign pauses itself
- Book appointments on a call — what moving a booking needs
- Ask for feedback after a visit — the call after the appointment